Make a Picture Voting Game with Node.js (Part 1)
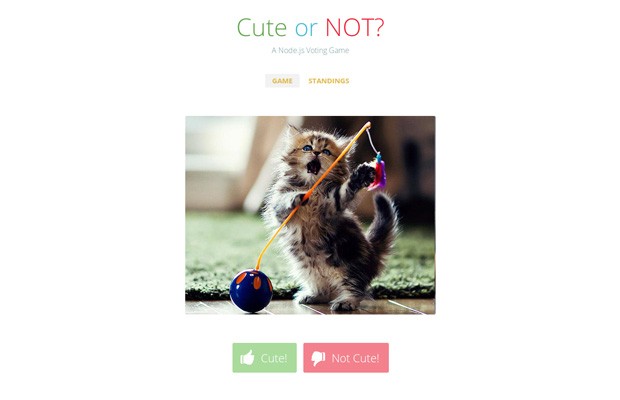
Node.js is becoming more and more popular. This JavaScript server is the perfect tool for real-time apps like chats, multiplayer games and collaboration tools. But you can use it to build regular web apps as well. All that you need to do, is to choose the right frameworks. This is what we will be doing today. We will code a "Hot or Not"-type picture voting game that will store its data in a NoSQL-type database.
The tutorial will be split in two parts. The first, which you can read below, covers the set up, directory structure and database. In the next part we will cover the routing and views. Read part 2.
The Idea
Our node.js application will be built on top of the Express framework, will use the handlebars engine for templates, and nedb for storing data. The app will allow visitors to vote on photos, one picture at a time. There will also be a rank list with the photos sorted by votes. Only one vote for a picture per IP address will be allowed.
There won't be any client-side JavaScript in this app - everything will be run on the server. For example, hitting the "Cute" button submits a form, like in the old days. I decided to go this route so that you could focus your attention entirely on the server-side code and I didn't want to complicate things with client-side libraries like Angular or Ember.

Installing Node.js
To follow this tutorial, you need to have node.js installed on your computer. This is straightforward - simply grab the correct package for your OS from node's download page. If you are running Linux or OSX, you will have to extract the archive somewhere, for example in $HOME/node (where $HOME is your home directory), and add $HOME/node/bin to your path by editing your .bashrc file. If you are running Windows, use the provided installer on the download page.
If everything works correctly, executing the node command in a console window will give you node.js's command prompt.
Running the Demo
If you wish to run the application at this point, you have to download the source code as a zip from the button near the top of the article, and extract it somewhere on your computer. You then have to navigate to the folder where the index.js file is located, and run the npm install command. This will download all the required libraries from the npm registry. Then all you need to do is to run node index.js and you will have your very own picture voting game on your computer!
Because the application allows only one vote per photo from IP, after you've voted on all the photos you can delete the /data/users file to be able to vote again.
The Directory Structure
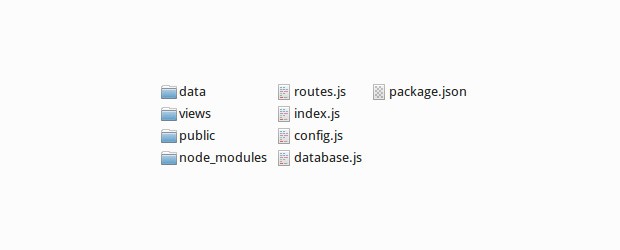
First, lets explain how our project will be organized. It will consist of a number of folders and files, that you will have to create manually.

- The data/ folder holds the nedb database files. They are plain text files holding JSON documents - you can even open them in a text editor and edit them.
- The node_modules/ folder is created automatically by npm when you run the npm install command. This is where the downloaded libraries are saved.
- The public/ folder contains the JavaScript, CSS, images and other assets that should be accessible by a browser. Put only things that you want people to see there.
- The views/ folder contains the templates that are used by the application. They are run through the
handlebarstemplating engine beforehand, as you will see when we discuss the routes file next time. - The package.json file describes the dependencies of your app (which libraries from the npm registry have to be downloaded), the name, license of the code and other information. We will be creating this file in the next section.
- The .js files contain the logic of the application. They are organized as node.js modules, and are included by index.js, which is also the entry point of the application. You run the app by executing the command
node index.js.
Create each of the folders and files. You can leave the files blank for now.
Creating the package.json
After you have the files in place, the next step to building our node.js app is to create the package.json file. It describes how your application should work, what license it has, its repository, author and more (see an interactive example here). Node comes with a handy utility that you can use to quickly create a valid package.json file. Open your console, navigate to the project directory that contains index.js and the other files, and execute the following command:
npm init
The utility will ask you some questions, and after this it will create your package.json file. From that moment on, when you install new libraries with npm, you will have to use the --save flag so that npm updates your package.json for you. Try it by running these commands:
npm install express --save
npm install nedb --save
npm install express3-handlebars --save
(Of course, you could install all three with one command.) These commands will instruct the node package manager to download the express, nedb and express3-handlebars libraries from the registry, to save them to the node_modules directory, and to update the dependencies property of your package.json file.
Here is the contents of our package.json:
{
  "name": "picture-voting-game",
  "version": "0.0.1",
  "description": "This is a simple picture voting game with node.js",
  "main": "index.js",
  "scripts": {
    "test": "echo \"Error: no test specified\" && exit 1"
  },
  "keywords": [
    "game",
    "picture",
    "voting"
  ],
  "author": "Martin Angelov",
  "license": "MIT",
  "dependencies": {
    "express": "~3.4.7",
    "nedb": "~0.9.4",
    "express3-handlebars": "~0.5.0"
  }
}
The Database Module
Now let's turn our attention to the database. As I mentioned in the beginning of the article, we will be using nedb for storing data. This is a lightweight pure JavaScript database. It is non-relational (NoSQL), and allows you to store arbitrary JSON objects (or documents). It lives in the same process as your node.js application, supports indexes and is quite fast. It is not suitable for large numbers of records (for that you will need something like MongoDB), but is perfect for smaller apps like the one we are writing today. Everything that is required to use this database, is to install the nedb package, which we already did in the previous section.
Our app needs two types of data sets - one for the photos, and another for the users. There will be one record per user, and each will hold an ip address and an array with all the pictures the user has voted on. In a regular database like MySQL we would have made a separate database table with the votes, which would have complicated things, but there is no need to do it like this here.
To make the code easier to maintain, we will extract the functionality for creating the data sets into their own node.js module. See the code below:
database.js
// Require the nedb module
var Datastore = require('nedb'),
    fs = require('fs');

// Initialize two nedb databases. Notice the autoload parameter.
var photos = new Datastore({ filename: __dirname + '/data/photos', autoload: true }),
    users = new Datastore({ filename: __dirname + '/data/users', autoload: true });

// Create a "unique" index for the photo name and user ip
photos.ensureIndex({fieldName: 'name', unique: true});
users.ensureIndex({fieldName: 'ip', unique: true});

// Load all images from the public/photos folder in the database
var photos_on_disk = fs.readdirSync(__dirname + '/public/photos');

// Insert the photos in the database. This is executed on every
// start up of your application, but because there is a unique
// constraint on the name field, subsequent writes will fail
// and you will still have only one record per image:

photos_on_disk.forEach(function(photo){
    photos.insert({
        name: photo,
        likes: 0,
        dislikes: 0
    });
});

// Make the photos and users data sets available to the code
// that uses require() on this module:

module.exports = {
    photos: photos,
    users: users
};
One more thing that this module does, is to scan the /public/photos folder (where our cat pictures are stored) for files using the built-in fs module. The photos are then inserted in the photos dataset.
The value assigned to the module.exports property, is the result that will be returned when database.js is require()-d in other files.
Continue with Part 2
This concludes the first part of the tutorial! In part two you will see the rest of the modules and the views. Read it here.
Bootstrap Studio
The revolutionary web design tool for creating responsive websites and apps.
Learn more
Awesome!
Reminds me of facematch :D
Nice article. Waiting for part 2.
BTW, on line 60 of Routes.js you're passing to the template all_photos instead of your newly created sorted_photos.
Thank you for spotting that! The sorted_photos assignment is unnecessary - the sort method changes the original array anyway. I will remove it for part 2.
Is there a chance to load pieces of text instead of images? If yes, then please do give a hint how to accomplish that.
Excellent work, like usually. I think Mark Zuckerberg have started like this, haven't he? :)
Wow! Demo Looks Great. Already waiting for the next part. Any plan for part 3 that can cover the Front End JavaScript so that the page doesn't do postback after every vote?
Thank you! No plans for a third part. But I will be writing more node.js tutorials that will include AJAX, websockets and more :)
i noticed if you vote on all of them, if another visitor (from different ip) it shows them they all have been voted on.
This shouldn't happen. Depending on how you've deployed your node.js application, you may need to add the 'trust proxy' express setting. Some hosts run your node apps behind nginx, or another proxy, so that all ip addresses the app sees are 127.0.0.1. The trust proxy setting fixes this.
Thank you again to bring this to us, Martin! Works great, simple, and clean.
Do you have any tutorials on setting up node js on a live server. Can you point to some links that would be great.